Playing With HTML Paragraphs: Let’s Show You Different Formatting Examples
Contents
Lines and Paragraphs
This section describes HTML associated with lines and paragraphs. We begin with the basic <DIV> and <P> tags.
This tutorial is provided for historical value. Some of the tags and attributes presented in this tutorial have been deprecated and should not be used. Browser support for deprecated elements and attributes may be limited and using them may produce unexpected results.
For a detailed look at modern html refer to our tutorials on semantic markup, HTML document structure, and fonts and web typography.
The <DIV> Element
<DIV>, a block-level element, simply defines a block of content in the page. Beyond defining a block, <DIV> itself doesn’t do anything. For example, the following code creates a <DIV> element with two paragraphs inside of it. Notice that you can put <P> elements inside a <DIV>.
This is stuff before the <NOBR><CODE><DIV ...></CODE></NOBR>.
<DIV> This is stuff inside the <NOBR><CODE><DIV ...></CODE></NOBR>.
<P> This is more stuff inside the <NOBR><CODE><DIV ...></CODE></NOBR>.</P></DIV>
This is stuff after the <NOBR><CODE><DIV ...></CODE></NOBR>.
Which gives us:
<DIV ...>.<DIV ...>.This is more stuff inside the <DIV ...>.This is stuff after the <DIV ...>.
The ALIGN Attribute
ALIGN sets the alignment of the contents of the <DIV> element. All four values, LEFT, CENTER, RIGHT, and JUSTIFY, are all well supported. LEFT is the default value.
This code shows the default:
<DIV>
This would be a great time for a cup of coffee, don't you think?
How about that! Let's drink coffee all day!
</DIV>
Which gives us:
The Paragraph Element
<P> indicates the start of a new paragraph. This is usually rendered with two carriage returns, producing a single blank line in between the two paragraphs:
This is the first paragraph. <P> And this is the second paragraph.
Which produces this:
The ALIGN Attribute
ALIGN indicates the alignment of the paragraph.
<P ALIGN=LEFT>This is aligned left. This is the default.</P>
<P ALIGN=CENTER>This is aligned center.</P>
<P ALIGN=RIGHT>This is aligned right.</P>
Which produces this:
This is aligned left. This is the default.
This is aligned center.
This is aligned right.
The CLEAR Attribute
CLEAR is recognized by some browsers and works very much like <BR>. However, it is not standard HTML and is still widely unsupported, so use <BR> instead.
Is the P Endtag Required?
The W3C says of </P>: “The end tag is optional as it can always be inferred by the parser.” This means that a new <P> implies the end of the previous <P> (and any alignment set by the previous <P>).
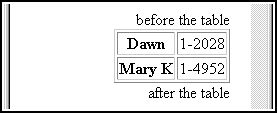
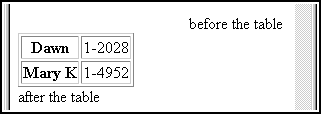
Any other block level element, such as <HR> or <BLOCKQUOTE> should also end the paragraph. However, it doesn’t always work out that way. Some browsers, for example, will right-align the text even after a table. In the following example, MSIE renders the “after the table” part as right aligned, while Netscape renders it as left aligned:
<P STYLE="text-align:right">
before the table

<TABLE BORDER>
  <TR><TH>Dawn</TH><TD>1-2028</TD></TR>
  <TR><TH>Mary K</TH><TD>1-4952</TD></TR>
</TABLE>

after the table
 |  |
| MSIE’s rendering | Netscape’s rendering |
If you set the alignment or other style property for a paragraph element it’s best to use </P>. If you never use set any styles then you can generally ignore </P>.
See W3C’s specs for paragraphs for more information on this topic.
Text Alignment
You can set the alignment of any HTML element using the text-align style rule. text-align can be used to set the alignment for a paragraph, a section of the document, or even the whole document. text-align can be used to set alignment to left, right, center, or justified.
For example, suppose we want to center a paragraph. First, we’ll create a styles class called centeralign by putting the following code into the “ section of the document:
<style>
.centeralign {
  text-align: center;
}
</style>
Now we can set any paragraph to centeralign class like this:
<p class="centeralign">Get Centered</p>
Which gives us this:
Get Centered
We can apply the same class to a <DIV> element to center a section of the page:
<div class="centeralign">
This is a center aligned bunch of text

<P>It stays center aligned because it is within
a DIV which has a center aligned style.

<P>Each element within the center aligned DIV
inherits the center aligned style.

</div>
Which gives us:
Each element within the center aligned DIV inherits the center aligned style.
Justification
By default, most browsers render text with a jagged right edge.
If you want all text rendered like in a book with an even right edge you can use a single style rule. To set all text to justified copy the following code into the “ section of your document.
<style>
body {
  text-align: justify;
}
</style>
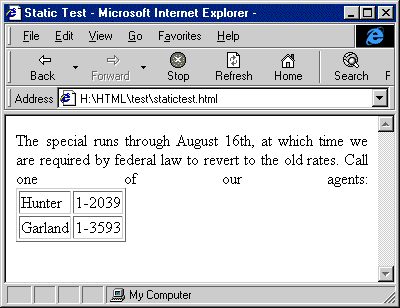
The problem with justification is that many browsers get confused about where the last line of text is (which shouldn’t be justified). For example, MSIE 4.x is confused when a block of text is immediately followed by a table. Notice in this image that the last line of text stretches the words “one of our agents” across a full line:

To remedy this situation surround all blocks of text with <P> and </P>:
<P>The special runs through August 16th, at which time we are required
by federal law to revert to the old rates. Call one of our agents:</P>

<TABLE BORDER>
<TR> <TD>Hunter</TD>  <TD>1-2039</TD>
<TR> <TD>Garland</TD> <TD>1-3593</TD>
</TABLE>
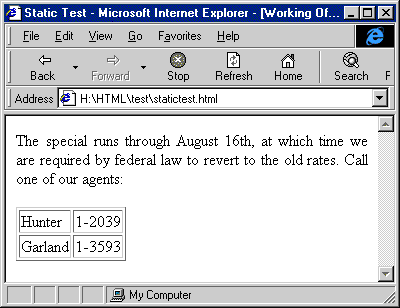
Now our errant MSIE renders things more sanely:

Indenting
There are several ways to indent paragraphs and entire sections of your web page. The next few sections describe the four main techniques for indentation:
- Indenting a Paragraph
- Indenting a Section of the Page
- Indenting the Whole Page
- Indenting the First Line of Each Paragraph
Before we begin, however, it’s worth saying a few words about <BLOCKQUOTE>. There’s a popular misconception that <BLOCKQUOTE> should be used to indent sections of the page. This belief comes from the fact that most visual web browsers render quoted text as indented. Remember, however, that HTML is not a formatting language and gives unpredictable results when you attempt to use it as one. Use <BLOCKQUOTE> if you have a quoted block of text, otherwise use the techniques described in the next few paragraphs.
Indenting a Paragraph
You can indent a single paragraph using styles. For example, suppose we want to indent a paragraph 50 points. First, we create a class called indented with the following style rules. Put this code in the “ section of your document.
<style>
.indented {
  padding-left: 50pt;
  padding-right: 50pt;
}
</style>
Now we set the class of the paragraph to indented by adding a CLASS attribute to the <P> tag:
<p class="indented">You don't know about me without you have read a book by the name of <em>The Adventures of Tom Sawyer</em>;
 but that ain't no matter. That book was made by Mr. Mark Twain, and he told the truth, mainly. There was
 things which he stretched, but mainly he told the truth. That is nothing. I never seen anybody but lied one
 time or another, without it was Aunt Polly, or the widow, or maybe Mary. Aunt Polly -- Tom's Aunt Polly, she
 is -- and Mary, and the Widow Douglas is all told about in that book, which is mostly a true book, with some
 stretchers, as I said before. - Opening to <em>Huck Finn</em></p>
Which gives us this indented paragraph:
You don’t know about me without you have read a book by the name of The Adventures of Tom Sawyer; but that ain’t no matter. That book was made by Mr. Mark Twain, and he told the truth, mainly. There was things which he stretched, but mainly he told the truth. That is nothing. I never seen anybody but lied one time or another, without it was Aunt Polly, or the widow, or maybe Mary. Aunt Polly — Tom’s Aunt Polly, she is — and Mary, and the Widow Douglas is all told about in that book, which is mostly a true book, with some stretchers, as I said before. – Opening to Huck Finn
Indenting a Section of a Page
To indent more than one paragraph we’ll use the same style as we set in the previous example. Put this code in the “ section of your page:
<style>
.indented {
  padding-left: 50pt;
  padding-right: 50pt;
}
</style>
Then we’ll use the indented class in a <DIV> element:
<div class="indented">
  <h2>Household Hazardous Waste</h2>
  <p>These items can be brought to the recycling center for redistribution. This is much better than throwing them out.</p>
  <ul>
    <li>Household cleaners</li>
    <li>Computers and computer accessories</li>
    <li>Clothes</li>
  </ul>
</div>
Which gives us an indented section like this:
These items can be brought to the recycling center for redistribution. This is much better than throwing them out.
- Household cleaners
- Computers and computer accessories
- Clothes
Indenting the Whole Page
If you want the entire page indented, set a style rule which sets right and left padding for the “ element. For example, this style sets the right and left padding to 100 pixels:
<style>
body {
  padding-left: 100px;
  padding-right: 100px;
}
</style>

This image is 56 pixels wide, so let’s set the padding to 60. The following style sets the background image, sets the repeat to repeat-y (only repeat vertically down the left side of the page) and sets the left padding to 60 (we won’t set the right padding).
<style>
body {
  background-image:url("blue.edge.gif");
  background-repeat:repeat-y;
  padding-left:60px;
}
</style>
Here’s how that might look:
- Household cleaners
- Computers and computer accessories
- Clothes
Indenting the First Line of Each Paragraph
To indent the first line of each paragraph set a style rule using text-indent. For example, the following code indents the first line of each paragraph 30 points. Copy this code into the “ section of your page:
<style>
  p {
    text-indent: 30pt;
  }
</style>
This code indents the first line of each <P> element, but you’ll probably run into an annoying problem. If you’re like most designers you probably don’t put a P before the first paragraph or between a header like <H1> and the text that follows it. Unfortunately, that’s exactly what you’ll need to do if you want the paragraph indented. The text in these situations is part of something called “anonymous blocks” and cannot be referred to directly. To indent it you must put the text in a <P> element.
So, for example, the following code does not have a <P> between the header and the text, so the text is not indented:
<H1>My Story</H1>
This paragraph is not indented.
Which gives us:
This paragraph is not indented.
This code does have a <P> between the header and the text, so the text is indented:
<H1>My Story</H1>
<P>This paragraph is indented.
This paragraph is indented.
The <BR> Element
<BR> inserts a single carriage return. Whereas <P> indicates the start of a new paragraph, <BR> only implies a carriage return within the same paragraph. <BR> is usually rendered with a single carriage return.
For example, this code:
There once was a man from Nantucket<BR>
Who kept all his dough in a bucket<BR>
His daughter name Nan<BR>
Ran away with a man<BR>
And as for the bucket, Nantucket
Which produces this:
Who kept all his dough in a bucket
His daughter name Nan
Ran away with a man
And as for the bucket, Nantucket
Because <BR> does not start a new paragraph, all the current paragraph attributes stay the same:
<P ALIGN=CENTER>
There once was a man from Nantucket<BR>
Who kept all his dough in a bucket<BR>
His daughter name Nan<BR>
Ran away with a man<BR>
And as for the bucket, Nantucket
Which produces this:
There once was a man from Nantucket
Who kept all his dough in a bucket
His daughter name Nan
Ran away with a man
And as for the bucket, Nantucket
The CLEAR Attribute
CLEAR says that in addition to inserting a line break, if there is a picture or other object to the right or left, go past that too. For example, this code says that the picture should be aligned on the left side of the page. Then there is some text, then LEFT. The text following that is past the picture:
<IMG SRC="../pumpkin.gif" HEIGHT=100 WIDTH=100 ALT="picture of a pumpkin" ALIGN=LEFT>
Come on down to the Halloween party!
You'll have a great ol' time.
<BR CLEAR=LEFT>8:00pm to midnight.
Wear a costume or come as your own scary self!
Which produces this:

8:00pm to midnight. Wear a costume or come as your own scary self!
BOTH is the same as ALL, but is not supported on as many browsers, so use ALL instead.
The CENTER Element
Usage Recommendation: Use <DIV> instead.
indicates a section that is centered. is exactly equivalent to <DIV ALIGN="CENTER">. “ is being phased out. Use <DIV ALIGN="CENTER"> instead.
<CENTER>Hi There! Let's talk about stuff!</CENTER>
Which gives us:
Which is the same as:
<DIV ALIGN=CENTER>Hi There! Let's talk about stuff!</DIV>
Which gives us:
The <HR> Element
<HR> draws a horizontal line (a “horizontal rule”) across the page. That’s it. For such a simple concept, horizontal rules are surprisingly popular. Let’s start with the basics. <HR> has no end tag and requires no attributes:
<P>Some text up here
<HR>
<P>Some text down here
Which creates this rule:
Some text up here
Some text down here
<HR> is usually indicates a division in the page. Stuff before the rule is in a different “section” from the stuff after. For that reason many designers consider <HR> a logical tag, not a layout tag.
The NOSHADE Attribute
NOSHADE indicates that the rule should be presented as flat instead of three dimensional. Compare this regular horizontal rule:
With a NOSHADE rule:
<HR NOSHADE>
Which gives us:
NOSHADE is often used in conjunction with SIZE:
<HR NOSHADE SIZE=10>
Produces this rule:
NOSHADE is popular because browsers usually don’t render three-dimensional rules very well. Indeed, in many circumstances the rule is presented in the same color as the background, rendering it almost invisible.
The SIZE Attribute
SIZE indicates the height of the rule. (I guess calling it “HEIGHT” would have just been too easy.) For horizontal width see WIDTH. Compare some of these sizes:
<HR>
<HR SIZE=1>
<HR SIZE=5>
<HR SIZE=20>
Which gives us these rules:
Browsers will generally not render an <HR> any bigger than 100.
The WIDTH Attribute
WIDTH sets the horizontal width of the rule. You can express the size in pixels or as a percentage.
These <HR>‘s are set with pixel widths:
<HR WIDTH="50">
<HR WIDTH="100">
<HR WIDTH="300">
Which gives us these rules:
WIDTH is usually expressed as a percentage. If you use a percentage width, be sure to enclose the value in quotes.
<HR WIDTH="25%">
<HR WIDTH="50%">
<HR WIDTH="100%">
Produces these rules:
The default is 100%. By default the rule is centered. To set a different alignment use ALIGN.
Percentage widths use the percentage of the available width, not the full width of the page. For example, if the rule is in a table then the width is a percentage of the width of the table cell.
<TABLE BORDER>
  <TR>
    <TD>Hey, whatever dude! <HR WIDTH="50%"> A stitch in time saves nine</TD>
  </TR>
</TABLE>
Which produces this table:
| Hey, whatever dude! A stitch in time saves nine |
The ALIGN Attribute
ALIGN sets the alignment of the rule. ALIGN is only useful if you also use WIDTH.
<HR WIDTH="40%" ALIGN=LEFT>
<HR WIDTH="40%" ALIGN=CENTER>
<HR WIDTH="40%" ALIGN=RIGHT>
Give us this:
The <PRE> Element
<PRE> is one the handiest tags in the HTML toolbox. <PRE> marks the text as “preformatted” — all the spaces and carriage returns are rendered exactly as you type them.
<PRE>
                title           extension
Raha            Producer        8765
Kathy           Accountant      8924
Scarlett        Security Guard      8273
</PRE>
Which produces this:
<PRE> text is rendered in a fixed width font, meaning that all characters and spaces are the same width. Fixed width makes it easy to lay out the text just the way you want it, so <PRE> is great for creating “quick and dirty” tables like the one above.
<PRE> does NOT cause the browser to ignore tags. You can still create links and other goodies:
<PRE>
        title       extension
<A HREF="">Raha</A>         Producer    8765
<A HREF="">Kathy</A>        Accountant  8924
<A HREF="">Scarlett</A>     Security Guard  8273
</PRE>
Produces this:
When you start adding markup, it gets harder to see how the text turns out (spacing your tags out evenly like the table above helps). <PRE> is often used to quote large blocks of text that you don’t want to “HTMLize”, but a “ could mess up the text. For a table larger than a few lines, it is usually easier in the long run to use table code.
The “ Element
“ prevents a carriage return from occurring. For example, the following code produces a nonsense poem of one long line:
<NOBR>
Twisting and turning, spinning and shouting, hissing and roaring,
fearing and jeering, stomping and yelling, running and jumping,
peeling and dicing, cooking and weighing, costing and pricing,
eating and drinking, all in a day's work.
</NOBR>
Which produces this:
is most useful for making the page layout more attractive by disallowing breaks inside logical groups of symbols and words. The poem quoted above breaks in appropriate places if each phrase is surrounded by:
<NOBR>Twisting and turning,</NOBR>
<NOBR>spinning and shouting,</NOBR>
<NOBR>hissing and roaring,</NOBR>
<NOBR>fearing and jeering,</NOBR>
<NOBR>stomping and yelling,</NOBR>
<NOBR>running and jumping,</NOBR>
<NOBR>peeling and dicing,</NOBR>
<NOBR>cooking and weighing,</NOBR>
<NOBR>costing and pricing,</NOBR>
<NOBR>eating and drinking,</NOBR>
<NOBR>all in a day's work.</NOBR>
Which produces this:
spinning and shouting,
hissing and roaring,
fearing and jeering,
stomping and yelling,
running and jumping,
peeling and dicing,
cooking and weighing,
costing and pricing,
eating and drinking,
all in a day’s work.
The “ Element
is for the situation where you have used to prevent line breaks in a section of text, and then you want to say “but you can break HERE if you want”. “ does not force a line break, it merely allows one:
<NOBR>Maybe it's because every time I get to the last line I feel like I have so much left to say that I have to try to <WBR> push and fit and cram as many words I can think of as I possibly can</NOBR>
Produces:
Having invented , Netscape now seems to have abandoned it. It's better to stick to grouping non-breakable sets of words within, like this:
<NOBR>Maybe it's because every time I get to the last line I feel like I have so much left to say that I have to try to</NOBR>
<NOBR>push and fit and cram as many words I can think of as I possibly can</NOBR>
Which gives us this paragraph:
push and fit and cram as many words I can think of as I possibly can
